Short Answer
When it comes to nurturing succulent plants, the art of repotting a cactus requires careful consideration and technique. This process not only rejuvenates the plant’s growth but also enhances its aesthetic presence in your home or garden. Understanding the essential steps involved in moving your cactus into a new pot can make this task both manageable and rewarding.
Before delving into the specifics, it’s crucial to recognize the indicators that signify it’s time to repot your cactus. Observing your plant’s growth patterns, noticing root entanglement, or recognizing a depletion of potting medium are all signs that your plant is ready for a new home. Additionally, seasonal changes, particularly spring, offer an optimal time for this process, as the plant emerges from its dormant phase.
Choosing the Right Pot: Pot Selection Essentials
When selecting a new pot for your cactus, several factors must be taken into account. Primarily, consider the size of the pot; it should be only slightly larger than the current one—about 1 to 2 inches in diameter. An excessively large pot can lead to water retention, which is detrimental to cacti, which thrive in arid conditions.
Material is another crucial aspect. Terracotta pots, known for their breathability, are an excellent choice as they allow moisture to escape, preventing root rot. However, you might also encounter ceramic or plastic pots. While they are often more visually appealing, ensure they have sufficient drainage holes to promote proper aeration.
Finally, think about the shape of the pot. A shallow, wide pot is ideal for cactus plants, as it supports the growth of their root systems, allowing the roots to spread out without becoming waterlogged.
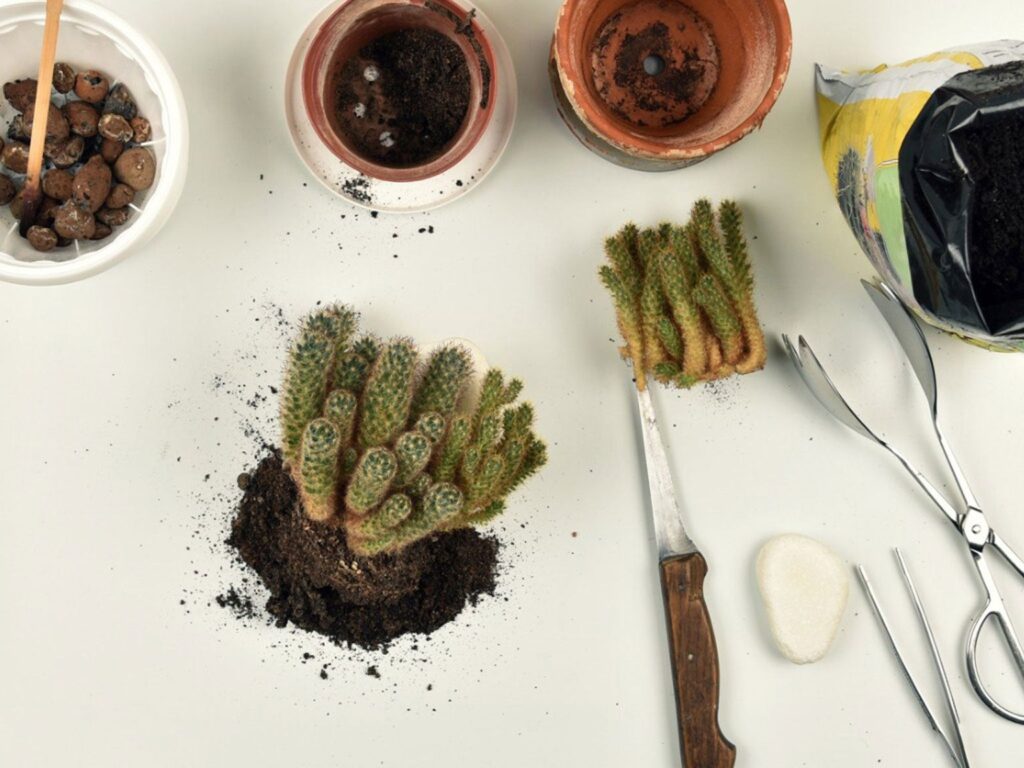
Preparing for the Move: Tools and Materials
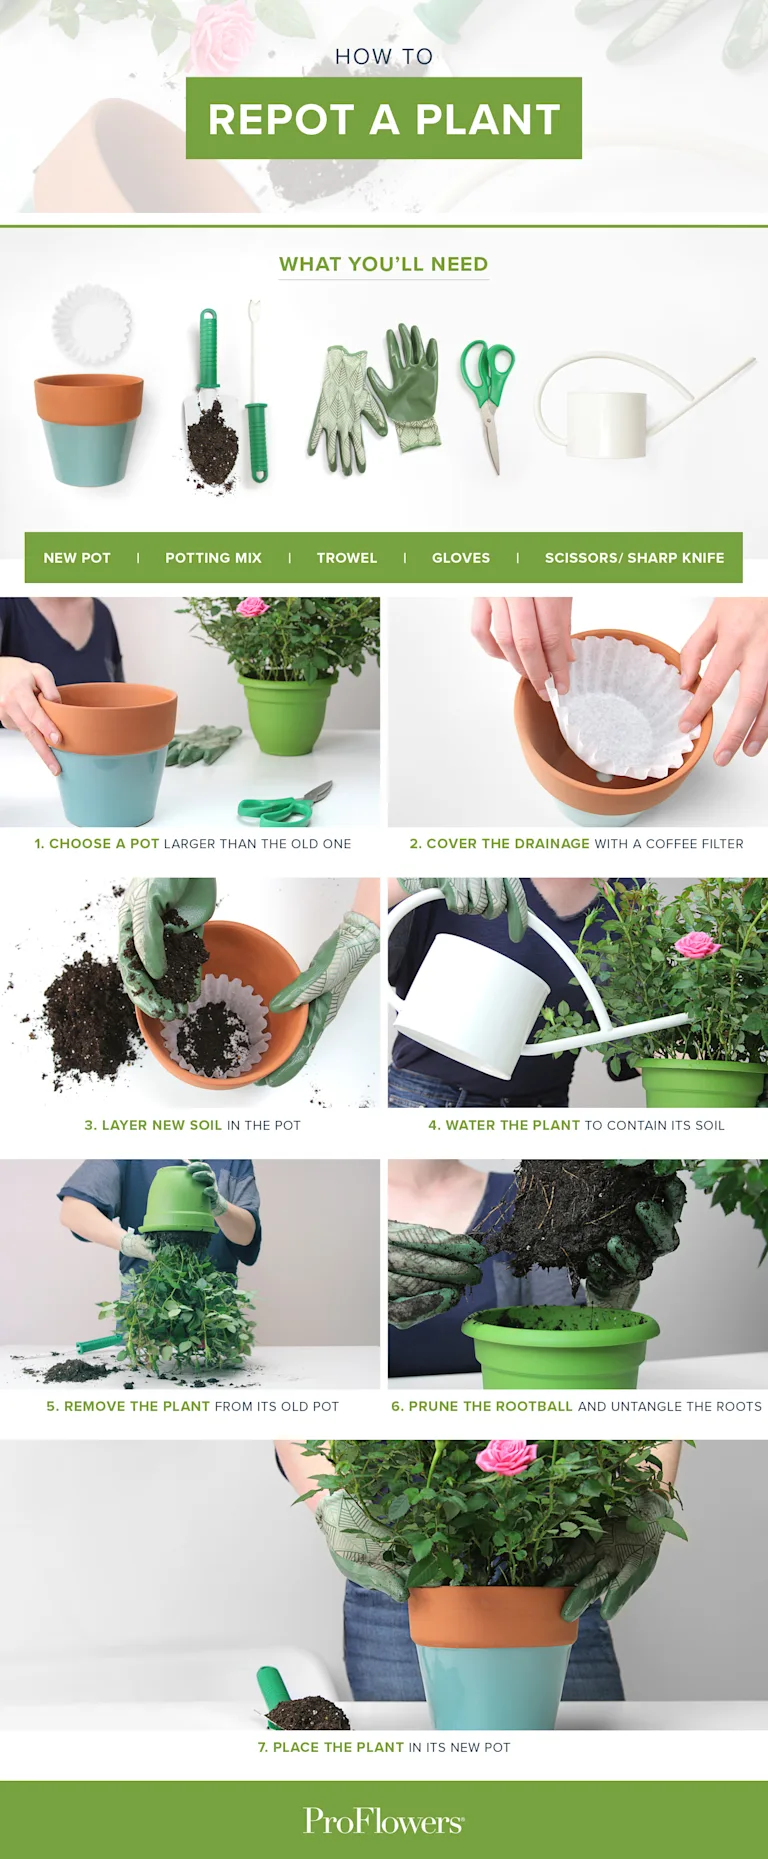
Before embarking on the repotting journey, gather the necessary tools and materials. You will need:
- A new pot with drainage holes
- Cactus potting mix or a well-draining soil blend
- Gloves for protection against the prickly spines
- A small trowel or spoon for scooping
- Watering can or spray bottle for moisture application
The cactus potting mix is vital, as it contains a mixture of sand, fine gravel, and organic matter, which facilitates good drainage and aeration. Avoid using ordinary potting soil, as it tends to retain too much moisture, which can be detrimental to your cactus.
The Repotting Process: Step-by-Step Guidance
Once you have gathered your materials, it’s time to commence the repotting process. Begin by ensuring that your cactus is ready to be handled. Allow the soil to dry out completely for a few days; this will minimize stress to the plant during the transition.
1. Carefully Remove the Cactus
Wearing gloves, gently grasp the cactus near its base. If the plant is particularly large or its spines make handling difficult, consider using cardboard or a towel as a buffer. Tilt the pot slightly and tap the sides to loosen the soil. With a gentle pull, release the cactus from the pot, being mindful of any stubborn roots.
2. Inspect the Roots
Once removed, examine the root system. Healthy roots are firm and pale, while unhealthy roots may appear mushy or blackened. Trim away any dead or diseased roots using sterilized pruning shears, ensuring the remaining roots are healthy and robust.
3. Prepare the New Pot
Before placing the cactus into its new home, fill the bottom of the new pot with a couple of inches of cactus potting mix. This layer will act as a cushion for the roots. Position the cactus upright, aligning it centrally within the pot.
4. Fill with Soil and Firm Down
Gently fill around the roots with additional potting mix, ensuring the cactus is stable and upright. Avoid burying the plant deeper than it was previously situated; the top of the root ball should remain just above the soil line. Firm the soil lightly with your fingers to remove air pockets, but be cautious not to compact the soil excessively.
5. Water with Caution
Initially, water the cactus sparingly after repotting. Too much moisture can lead to root decay, especially as the plant adapts to its new environment. Mist the soil with a fine spray to encourage hydration without oversaturating the roots. Monitor the plant closely over the following weeks for any signs of stress.
Caring for Your Newly Repotted Cactus: Post-Repotting Maintenance
Post-repotting, provide your cactus with optimal conditions to thrive. Place it in a spot with abundant indirect sunlight, as direct sunlight may scorch the plant after the disruption of its roots. Gradually reintroduce it to brighter light conditions over the course of several weeks.
During the next month, minimize watering to prevent root rot. Instead, assess the moisture level of the soil by checking the top inch; only water when it feels completely dry to the touch. After a few weeks, you can resume a regular watering schedule as needed.
Ultimately, repotting a cactus is a straightforward process that fosters the overall health and vitality of the plant. With conscientious care and attention to detail both before and after repotting, your cactus can flourish in its new environment, adding beauty and resilience to your green sanctuary.
FAQ
How do I know when my cactus needs repotting?
Signs include root entanglement, depleted soil, or the cactus outgrowing its current pot.
Can I use regular potting soil for my cactus?
No, regular potting soil retains too much moisture and can cause root rot; use a specialized cactus mix instead.
Should I water my cactus immediately after repotting?
It is best to water sparingly and allow the soil to dry out between waterings to avoid root decay.
What protective gear should I use when repotting?
Wear gloves to protect your hands from cactus spines and consider using a towel or cardboard for handling.

Leave a Reply