Short Answer
Snake plants, also known as Sansevieria or mother-in-law’s tongue, are esteemed for their resilience and ability to thrive in various conditions. Dividing a snake plant can be an effective way to propagate and rejuvenate your plant. However, improper techniques may lead to damage, stunting growth, or even death. This guide will elucidate the intricacies of dividing a snake plant without inflicting harm, ensuring you can extend its life while enjoying the benefits of propagation.
Understanding the Anatomy of Snake Plants
Before diving into the division process, it is paramount to comprehend the fundamental structure of a snake plant. Snake plants are comprised of thick, fleshy leaves that grow upright from a central rhizome, which serves as a storage organ for nutrients and water. This rhizome is crucial for the plant’s survival and must be treated with care during division. Each leaf blade can withstand significant neglect, but the rhizome needs to remain healthy for the plant to thrive post-division. Adequate knowledge of its anatomy will facilitate a more considerate approach while dividing the plant.
The Optimal Timing for Division
The timing of division plays a vital role in the success of this endeavor. Ideally, you should attempt to divide your snake plant during its active growing season, which occurs in the spring or early summer. During this time, the plant is better equipped to recover from the stress associated with division. Attempting to divide a snake plant in the dormant fall or winter months may lead to complications, as the plant is not actively growing and may nigh on perish from the disruption to the root system.
Signs You Should Consider Division
Identifying when to divide your snake plant is essential. If your snake plant exhibits signs of overcrowding, such as multiple shoots tightly packed together or shallow root systems visible through drainage holes, it is time to consider division. Other indicators may include stunted growth, yellowing leaves, or failure to thrive despite adequate watering and lighting. Recognizing these signs will help ensure timely intervention, promoting a healthier plant in the long run.
Gathering the Necessary Tools
Preparation is key when it comes to successfully dividing a snake plant. Ensure you have gathered the following tools:
- A sharp, clean knife or garden spade to facilitate precise cuts
- A pair of gardening gloves to protect your hands
- A clean pot with drainage holes, filled with well-draining potting mix
- Water for lightly moistening the soil
- Optional: a fungicide to treat any cut surfaces and prevent infection
Engaging in this preparatory step will enhance your chances of success and safeguard the plant’s health during the division.
Step-by-Step Guide to Dividing Snake Plants
Once you are adequately prepared, follow these systematic steps to ensure a successful division:
1. Remove the Plant from Its Pot
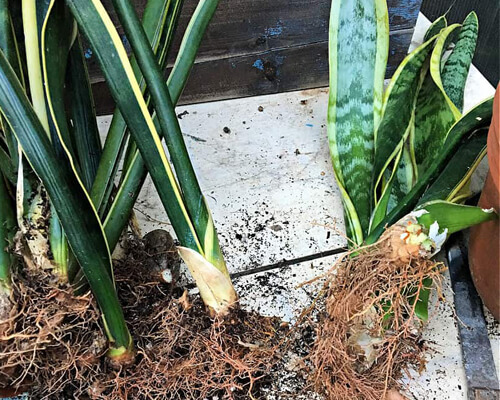
Gently grasp the base of your snake plant and tilt it sideways to ease it from its container. Avoid yanking or pulling, as this could damage the roots. If it resists, using a blunt knife to loosen the edges may be necessary.
2. Inspect the Root System
Once liberated, observe the rhizomes and roots closely. If they appear healthy—firm and white—you are in good shape. However, if any roots are mushy or discolored, trim these away with your sharp knife.
3. Segment the Rhizome
Identify the distinct clumps of leaves attached to the rhizome. Using your knife, divide the rhizome into sections, ensuring that each section retains roots and at least one leaf, as this will allow each new plant to sustain itself effectively. Aim for divisions that are manageable in size, typically three to five leaves each.
4. Clean the Cuts
Once divided, allow the cut surfaces of the rhizomes to dry for several hours to minimize the risk of rot. Optionally, apply a fungicide to the cuts, providing additional protection against pathogens.
5. Replant the Divisions
Plant each division into its new pot filled with well-draining potting mix. Ensure the rhizome is positioned below the soil surface while the leaves remain above. Water lightly to settle the soil but avoid saturating it; too much moisture can lead to root rot.
6. Post-Division Care
Following division, position your newly potted snake plants in a location with indirect sunlight, allowing them to acclimate without the added stress of direct light. Refrain from vigorous watering for the first few weeks, allowing the roots to establish themselves. Monitor the moisture levels closely; overwatering is a common pitfall that can quickly lead to demise.
Conclusion: A Successful Future for Your Snake Plant
By following these guidelines and employing thoughtful techniques, you can successfully divide a snake plant without killing it. With patience and care, your newly propagated plants can flourish and contribute to the lush beauty of your indoor garden. Always remember that each division is an opportunity—not just for propagation, but for enhancing your gardening expertise. Happy gardening!
FAQ
When is the best time to divide a snake plant?
The best time to divide a snake plant is during its active growing season in spring or early summer, when it can recover more easily from the division process.
How can I tell if my snake plant needs dividing?
Signs that your snake plant needs dividing include overcrowding with multiple shoots tightly packed, visible shallow roots through drainage holes, stunted growth, or yellowing leaves.
What tools do I need to safely divide a snake plant?
You will need a sharp, clean knife or garden spade, gardening gloves, a clean pot with drainage holes, well-draining potting mix, water, and optionally a fungicide to treat cut surfaces.
How should I care for snake plants after division?
After division, place the new plants in indirect sunlight, avoid overwatering, and allow roots to establish by watering lightly and monitoring moisture levels.

Leave a Reply