Agave plants have long captivated gardeners and plant enthusiasts alike with their striking architectural forms and resilience in arid conditions. Often associated with the sun-drenched deserts of Mexico, these succulent wonders offer much more than ornamental appeal. Propagating agave plants is a rewarding endeavor that not only results in new plants but also instills a sense of connection to nature and the intricate processes of life.
The urge to cultivate and propagate these resilient specimens can be attributed to their near-mythical status in horticultural circles. Their adaptation strategies and unique reproductive methods often lead to a formidable allure. For those fascinated by the prospect of propagating agave plants, understanding the fundamental methods can pave the way for success and satisfaction in cultivation.
Commencing with the Basic Biology of Agave
Agave plants are perennial succulents, belonging to the Asparagaceae family. They are characterized by thick, fleshy leaves that store water, enabling them to thrive in arid environments. The fascinating lifecycle of an agave includes a remarkable flower stalk that, when it emerges, can reach towering heights, flowering only once before the plant dies. However, this cycle also leads to the generation of offsets, or “pups,” which can serve as a basis for propagation.
Understanding the anatomy of an agave is advantageous for successful propagation. The central rosette, which houses the leaves and the growth point, is essential for nurturing pups. Each offset develops roots and can survive independently once detached, making this method of propagation particularly appealing.
Mastering the Methods of Propagation
There are several effective methods for propagating agave plants, each offering distinct advantages and considerations. The most common practices include offset division, leaf cuttings, and seed propagation.
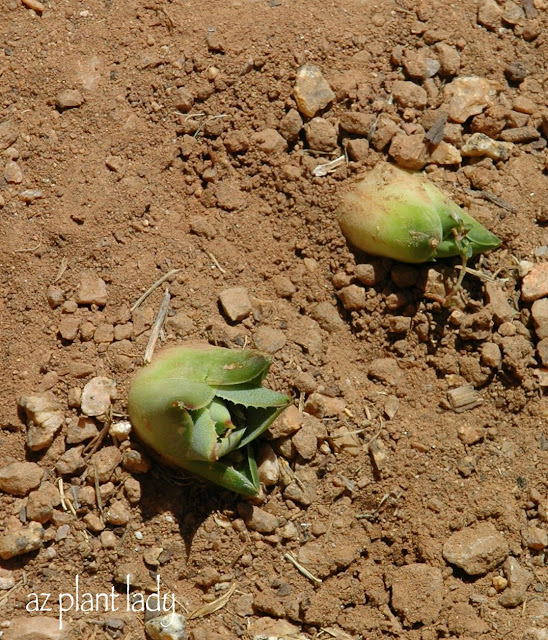
Offset Division: The Most Popular Technique
Offset division is arguably the most popular method among agave enthusiasts. This method is favored for its simplicity and high success rate. Here’s how to execute offset division effectively:
- Identify Pups: Look for healthy pups sprouting from the base of the parent plant. These offsets should ideally be at least a few inches tall to ensure they can survive independently.
- Severing the Offset: Using a sharp, sterile knife, carefully separate the pup from the parent plant. Ensure that some roots are attached to the offset to increase the likelihood of survival.
- Drying the Wound: Place the severed pup in a warm, dry location for a few days, allowing the cut area to form a callus. This step is vital for preventing rot when the pup is planted.
- Planting: After callusing, fill a well-draining succulent mix into a pot. Plant the offset with the roots in the soil and gently water it to settle the soil.
- Aftercare: Position the new plant in bright, indirect sunlight. Avoid overwatering, as agave plants are susceptible to root rot.
Leaf Cuttings: A Riskier Method
Although less common, propagating agave through leaf cuttings is an intriguing technique that can yield results, albeit with more labor. This method calls for an understanding of the plant’s biological makeup and is generally more suitable for advanced growers.
- Selecting Leaves: Choose healthy, plump leaves from the base of the plant. Select leaves that are mature and free from blemishes.
- Cutting the Leaves: Cut the leaves into sections of about six inches each. It’s essential to include a base section for rooting.
- Callousing: Allow the cut sections to dry out for several days, forming a callus over the cut edges. This process is crucial for preventing fungal infections.
- Rooting the Sections: Place the cut sections upright in a soil mix formulated for succulents, and lightly water. The base will eventually develop roots provided there is adequate humidity.
Seed Propagation: The Longest Journey
Seed propagation is another viable method but is regarded as the most time-consuming and labor-intensive option. It requires patience, knowledge, and specific conditions for success:
- Collecting Seeds: Seeds are harvested from the mature flower stalk after the agave has bloomed. Ensure seeds are fully mature for optimal germination rates.
- Sowing the Seeds: Germinate the seeds in a sandy, well-draining soil mix. Lightly cover them with soil and maintain a warm, humid environment to simulate natural conditions.
- Germination Time: Expect germination to occur over several weeks to months. Once seedlings are established, they can be transferred to individual pots.
Encouraging Successful Growth with Optimal Care
Regardless of the propagation method chosen, providing optimal care is essential for fostering healthy agave plants. Understanding the nuanced needs of these succulents will contribute to a successful cultivation experience.
- Light Requirements: Agave plants thrive in bright light, benefiting from several hours of direct sunlight each day. This exposure induces robust growth and vibrant coloration.
- Water Management: The adage “less is more” holds true for agave. Water sparingly, allowing the soil to dry out completely between watering sessions. This method mimics their natural habitat.
- Soil Selection: Utilize a well-draining soil mix tailored for succulents, enriched with perlite or sand to aid with drainage and reduce rot risks.
- Temperature Preferences: Agave prefers warm temperatures, ideally ranging between 60°F to 75°F (15°C to 24°C). Protect from frost to ensure longevity.
In conclusion, successfully propagating agave plants invites not just the flowering of new growth but also a profound appreciation for the remarkable adaptability of these resilient succulents. The act of cultivation fosters a deeper connection to nature, reminding horticulturalists of the delicate balance inherent in ecosystems. Thus, embarking on this propagation journey is a celebration of both the wonder of agave and the intricate dance of life itself.


Leave a Comment