Christmas Cactus (Schlumbergera) is a delightful houseplant cherished for its striking, tubular blooms that herald the holiday season. Unlike traditional cacti, these beauties thrive in humid environments and bloom during the winter months, making them perfect companions for festive decor. For those interested in enhancing their indoor landscapes, propagation and planting of Christmas Cactus can become an engaging horticultural project. This article guides you through the nuances of propagation, planting, and nurturing Christmas Cactus plants, ensuring lush displays of blooms for seasons to come.
Understanding the Christmas Cactus: A Brief Overview
Before delving into propagation techniques, it is beneficial to comprehend the unique characteristics of the Christmas Cactus. Originating from the forests of Brazil, this succulent resides in a warm, sheltered environment where it often clings to trees. Notably, its segments, known as “flattened stems” or phylloclades, can create an appealing cascading effect as they mature. The blooms, which vary in color from white to vibrant pink or red, are produced at the tips of these segments and can last for several weeks.
With these whimsical aesthetics, a well-cared-for Christmas Cactus can become a treasured family heirloom, passed down through generations. Its ability to thrive with minimal care, coupled with the joy it brings during the holiday season, makes the Christmas Cactus a popular choice for plant enthusiasts everywhere.
The Propagation Process: Cultivating New Plants
For those eager to cultivate their own Christmas Cacti, propagation can be accomplished through cuttings. This method is relatively straightforward and does not require elaborate equipment. Here’s a comprehensive breakdown of the steps involved:
Choosing the Right Time
The ideal time for taking cuttings is after the blooming period, typically in late winter or early spring. At this point, the plant directs its energy towards growth, making it an opportune moment for propagation.
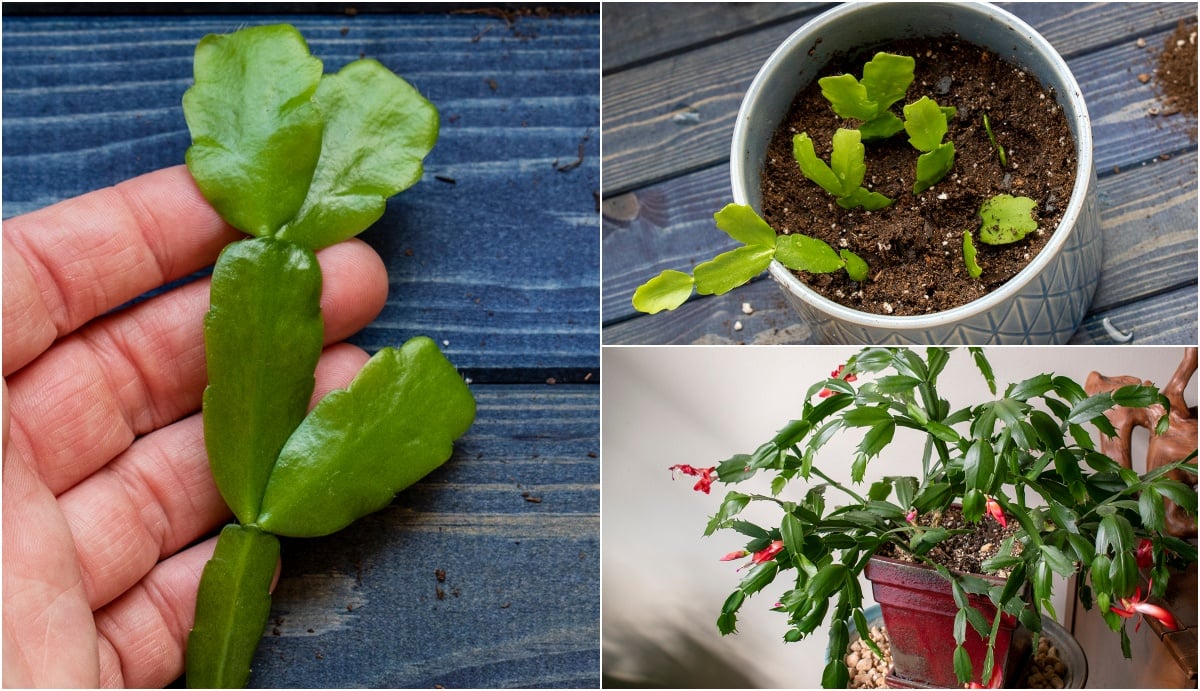
Selecting the Cuttings
When selecting cuttings, choose healthy segments with at least two to three segments joined together. Stress is key; avoid using diseased or weak stems. Use a clean, sharp knife or scissors to make a clean cut. This prevents any disturb or damage to the plant, fostering a healthier propagating process.
Preparing the Cuttings
Once cut, allow the segments to callous over for several hours or overnight. This crucial step helps prevent rot once the cuttings are placed in soil. Place the cuttings in a dry, shaded location during this time.
Rooting the Cuttings
After the cuttings have formed a callous, it is time to plant them. Prepare a well-draining potting mix, preferably a blend tailored for succulents. A mix of potting soil, sand, and perlite is often ideal. Insert the cuttings into the soil, burying them approximately one inch deep. Water lightly, ensuring that the soil remains moist but not saturated. Covering the pot with plastic wrap or a transparent bag can help maintain humidity, promoting faster rooting.
Patience is Essential
Rooting can take several weeks. During this period, maintain a warm, bright location but out of direct sunlight. After roots have developed, typically indicated by new growth or firm segments, the new plants are ready for transplanting.
Transplanting: Setting Your Christmas Cactus for Success
Once the cuttings have root systems, it is time to move them to their permanent homes. Selecting the right pot and soil mix plays a vital role in their growth and success.
Choosing the Right Pot
Opt for pots that feature drainage holes to prevent waterlogging, which can be detrimental to root health. Terracotta pots are an excellent choice, as they allow for moisture evaporation, reducing the risk of excessive dampness.
Preparing the Soil Mix
A well-draining soil blend is crucial. Using a commercial cactus mix or creating a homemade mix using potting soil, sand, and perlite will work well. This setup ensures that water drains rapidly, preventing root rot.
Planting the Cactus
Fill the pot with the prepared soil mix, creating a small depression in the center for the plant. Carefully place the rooted cutting in the hole, ensuring that the top of the cutting is level with the pot’s edge. Gently pack the soil around the base to secure the plant. Water lightly.
Caring for Your New Christmas Cactus
Post-transplanting, adequate care is necessary to help the Christmas Cactus thrive. Here are essential care tips:
Light Requirements
Christmas Cacti prefer bright, indirect light. Direct sunlight can scorch the leaves, hence positioning them near a window with filtered light is ideal. Rotate the plant occasionally to ensure even growth.
Watering Practices
Keeping the soil evenly moist is critical, especially during the growing season. Allow the top inch of soil to dry out between waterings. In the winter, when the plant enters dormancy, reduce watering frequency, only watering when the soil appears dry.
Feeding
During the growing season, a balanced liquid fertilizer diluted to half strength can be administered every month. Hold off feeding during the dormant winter months.
Conclusion: A Gift That Grows
Propagation and care of the Christmas Cactus promise rewarding floral displays that brighten the cold winter months. With straightforward techniques, anyone can cultivate their indoor garden, ultimately enjoying seasonal blooms year after year. As you embark on your propagation journey, remember that patience and attention to detail are vital. Happy gardening!


Leave a Comment