Transplanting Aloe Vera Cuttings: Tips for Success
Aloe Vera, revered for its myriad of medicinal and cosmetic uses, is a succulent that thrives in diverse environments. One of its most rewarding aspects is the ability to propagate it through cuttings. Transplanting Aloe Vera cuttings not only enhances your garden’s aesthetic but also ensures the continuity of this resilient plant. Understanding the intricacies of this process is essential for optimal growth and health.
In this comprehensive guide, we will explore the fundamental steps, optimal conditions, and best practices for successfully transplanting Aloe Vera cuttings.
Understanding the Anatomy of Aloe Vera
Before embarking on the journey of transplanting Aloe Vera cuttings, it is crucial to familiarize oneself with the essential anatomy of the plant. Aloe Vera is characterized by thick, fleshy leaves that store water, enabling it to flourish in arid environments. The plant propagates through offsets or “pups,” which are small shoots that emerge at the base of the mature plant.
These pups become independent plants if properly cared for. When selecting a pup for transplanting, look for one that is at least a few inches tall with a few developing leaves. The cuttings should ideally have their own roots, as this greatly enhances the chances of successful acclimatization.
Preparing for the Transplantation Process
The success of transplanting Aloe Vera cuttings hinges on proper preparation. Drawing up a strategy before diving into the actual process is paramount.
Selecting the Right Time
Timing is everything when it comes to transplanting. The best time to transplant Aloe Vera cuttings is during the spring or early summer when the plant is in its active growth phase. This timing ensures that the cuttings have a better chance to establish themselves before the onset of dormancy in the colder months.
Gathering Essential Tools
Equipping yourself with the right tools before beginning will save time and minimize stress. You will need:
- Sharp, clean knife or pruning shears for cutting pups.
- Small containers or pots with drainage holes.
- Well-draining potting mix or cactus soil to promote optimal root growth.
- Gloves to protect your hands from the plant’s sap and sharp edges.
- Watering can or spray bottle for gentle irrigation.
The Transplanting Process: A Step-by-Step Guide
With preparation complete, it is time to transplant the Aloe Vera cuttings. Follow these steps to ensure success:
Harvesting the Cuttings
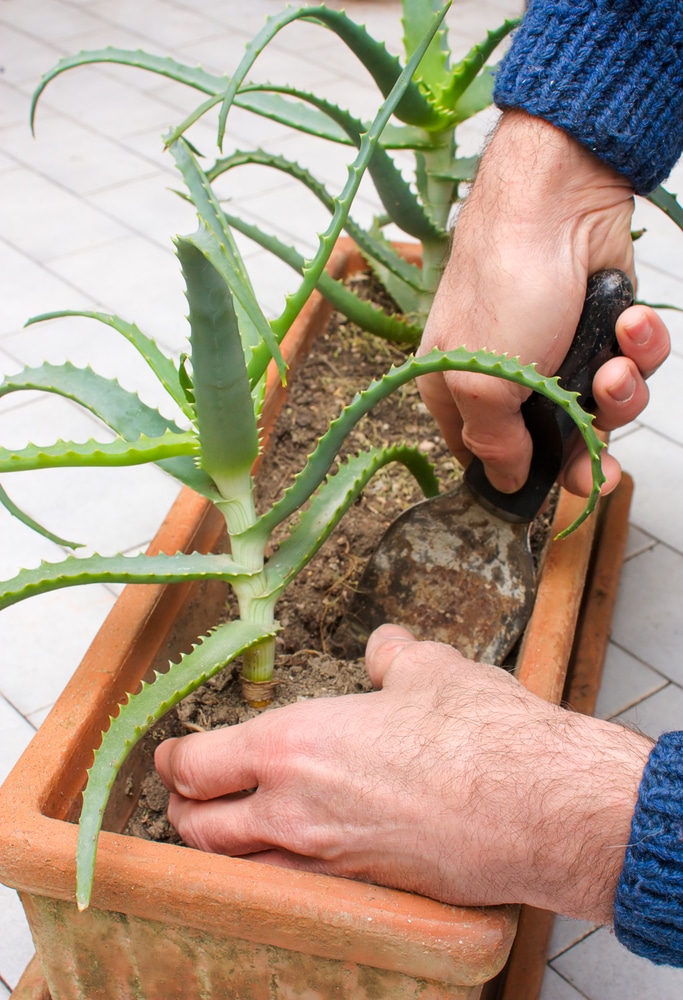
Using a sharp, sterile knife or pruning shears, carefully cut the chosen pup from the base of the main plant. Make the cut at the base of the pup, ensuring you include some of the surrounding roots if possible. This minimizes transplant shock and aids in root establishment.
Letting the Cuttings Callous Over
After cutting, allow the Aloe Vera pup to sit in a shaded area for up to 24 hours. This process, known as callousing, forms a protective layer over the cut surface, reducing the risk of rot when introduced to soil.
Preparing the Potting Mix
While your cuttings are callousing, prepare your potting mix. A well-draining mix is paramount. You can purchase commercial cactus soil or create your own blend using equal parts potting soil, sand, and perlite. The addition of these components ensures excellent drainage, which is crucial for the succulent’s health.
Planting the Cuttings
Once the cuttings have developed a callous, it’s time to plant. Fill your container with the prepared potting mix to the appropriate depth, ensuring you leave space for the roots. Create a small hole in the center for the pup. Place the cutting upright, then gently pack the soil around it to provide stability. Water sparingly to avoid over-saturation.
Establishing Optimal Conditions
Following transplantation, the environment plays a pivotal role in the acclimatization of Aloe Vera cuttings. Here are several conditions to cultivate for optimum growth:
Lighting Requirements
Aloe Vera thrives in bright, indirect sunlight. After transplanting, place the new pots in a location with plenty of light but out of direct sunlight until they establish roots. Gradually acclimatize them to more direct light once you notice signs of new growth.
Temperature and Humidity
Aloe Vera is primarily a desert plant and prefers warm temperatures ranging from 60°F to 75°F (15°C to 24°C). Ensure that the environment isn’t too humid, as excessive moisture can lead to rot. Air circulation is also essential; avoid overcrowded placements.
Watering Practices
Keep the soil slightly moist but avoid over-watering. Allow the top one to two inches of the soil to dry out between watering sessions. Check the soil consistently to ensure it retains a suitable moisture level without becoming overly saturated.
Signs of Success and Future Care
In the weeks following transplantation, monitor your cuttings for signs of growth. Healthy Aloe Vera cuttings will begin producing new leaves and roots. If you observe any signs of distress—such as discoloration or wilting—reevaluate the environmental conditions and watering practices.
As your Aloe Vera plants mature, additional care includes occasional fertilization during the growing season with a diluted cactus fertilizer and repotting every couple of years to accommodate their growing roots. Regularly inspect for pests and diseases, addressing any issues promptly.
Conclusion
Transplanting Aloe Vera cuttings can be a rewarding endeavor. By understanding the fundamental aspects of this process, one can cultivate healthy and vibrant plants that enhance any space. With careful attention to timing, preparation, environmental conditions, and ongoing care, these resilient succulents will thrive and continue to provide their myriad benefits for years to come.


Leave a Comment