
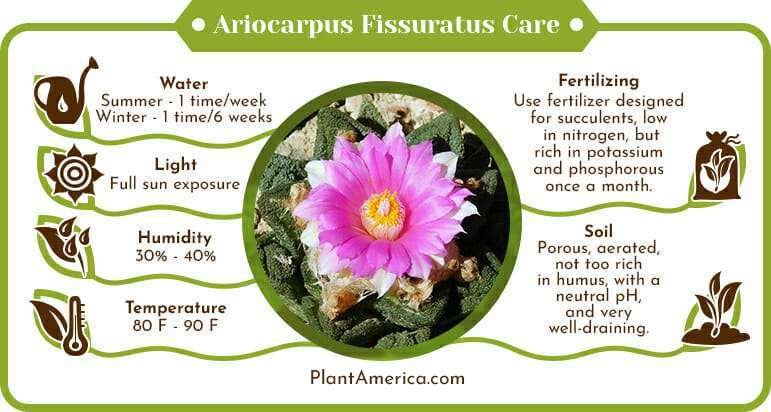
Short Answer
Repotting an Ariocarpus isn’t just a gardening chore—it’s a delicate dance between nurturing resilience and respecting the quiet strength of these desert jewels. These slow-growing cacti, with their geometric rosettes and cryptic camouflage, demand more than mere horticultural attention; they require a tender, almost reverent approach. Whether you’re a seasoned succulent whisperer or a novice enchanted by their alien beauty, understanding the art of repotting can transform a stressful upheaval into a flourishing renewal. This guide isn’t just about soil and pots—it’s about listening to the silent signals of a plant that thrives in adversity, and responding with the patience of a desert dawn.
The Art of Timing: When to Repot Ariocarpus Without Disrupting Its Rhythm
Ariocarpus plants are not fans of abrupt transitions. Their growth cycles are dictated by the subtle shifts of their native Chihuahuan Desert habitat, where patience is the only currency. The ideal window for repotting is during their dormant phase, typically in late winter or early spring, just as the first whispers of warmth stir beneath the soil. Repotting during active growth can shock the plant, stunting its already glacial progress. Watch for signs like roots peeking through drainage holes or soil that has decomposed into a dense, moisture-retentive mass—both are silent pleas for a new home. Avoid the scorching months of summer, when the plant is conserving energy, and the chilly grip of winter, when metabolic activity slows to a crawl. Timing isn’t just practical; it’s an act of solidarity with the plant’s natural cadence.
Selecting the Perfect Vessel: Pots That Honor the Ariocarpus’s Solitude
The right pot isn’t just a container—it’s a sanctuary. Ariocarpus plants despise soggy feet, so drainage is non-negotiable. Terracotta pots, with their porous walls, wick away excess moisture and prevent the dreaded root rot, making them a near-perfect match. If you’re drawn to the sleekness of ceramic or plastic, ensure the vessel has ample drainage holes and consider adding a layer of coarse gravel or perlite at the base. Size matters, too. A pot that’s too spacious can trap moisture, while one that’s too snug stifles root expansion. Aim for a container that’s only slightly larger than the plant’s current home—just enough room for growth without overwhelming the Ariocarpus’s modest ambitions. Think of it as curating a minimalist’s habitat, where every element serves a purpose.
The Soil Alchemy: Crafting a Substrate That Mimics the Desert’s Embrace
Ariocarpus plants are purists when it comes to soil. They thrive in gritty, well-draining mixes that mirror the mineral-rich, organic-poor landscapes of their origin. A blend of 50% inorganic material—such as pumice, perlite, or coarse sand—and 50% organic components like coconut coir or a high-quality cactus mix creates the ideal balance. Avoid peat-heavy soils, which compact over time and suffocate roots. For an extra touch of authenticity, add a sprinkle of crushed granite or decomposed granite to the mix, mimicking the rocky outcrops where these plants cling to life. The goal isn’t just to provide nutrients but to replicate the harsh, yet nurturing, conditions of their natural habitat. This isn’t soil; it’s a lifeline.
Gentle Extraction: Freeing the Roots Without a Struggle
Repotting should never feel like a surgical procedure, but for Ariocarpus plants, it can feel like a lifeline. Begin by watering the plant lightly a day or two before repotting—this softens the soil and reduces the risk of root damage. Gently squeeze the sides of the pot to loosen the root ball, then tilt it sideways and coax the plant out with the help of a wooden skewer or a soft brush. If the roots are stubbornly entangled, resist the urge to yank; instead, use your fingers to tease them apart with the delicacy of a surgeon. Trim any blackened or mushy roots with sterilized scissors—these are signs of rot, and their removal is an act of mercy. Handle the plant like a fragile heirloom, for in your hands lies its future.
Positioning with Precision: The Subtle Art of Plant Placement
Where the Ariocarpus sits in its new home is just as critical as the pot itself. Place the plant in the center of the container, ensuring the base of the stem sits just below the rim—this prevents water from pooling around the neck, a common site for rot. If the plant has a taproot, position it so the root points downward, mimicking its natural growth direction. For species with flattened or disc-like bodies, such as Ariocarpus retusus, ensure the top of the plant sits slightly above the soil line to avoid burying its crown. The goal is to create a harmonious balance, where the plant feels both supported and unconstrained. Think of it as arranging a piece of living art—every angle should feel intentional.
Post-Repotting Care: Nurturing Recovery with Patience and Finesse
The first few weeks after repotting are a vulnerable period for an Ariocarpus. Resist the urge to water immediately; instead, wait 5–7 days to allow any disturbed roots to callus over. During this time, place the plant in a bright, indirect light—direct sunlight can scorch tender new growth. Hold off on fertilizing for at least a month; Ariocarpus plants are not heavy feeders, and excess nutrients can do more harm than good. Monitor the soil moisture closely; it should be dry to the touch before you consider watering again. If the plant shows signs of stress, such as wrinkling or discoloration, don’t panic. Stress is often temporary, and with the right conditions, the Ariocarpus will rebound with quiet dignity. This is where your role shifts from caretaker to silent observer—trust the process.
Troubleshooting Common Pitfalls: When the Ariocarpus Sends Distress Signals
Even the most careful repotting can go awry, and Ariocarpus plants are not shy about communicating their discomfort. Yellowing or softening stems may indicate overwatering, while a shriveled appearance suggests underwatering or root damage. If the plant tilts or topples, it’s a sign the soil wasn’t compacted enough during repotting—gently firm the mix around the base and adjust the plant’s position. Fungal infections, often signaled by black spots or a foul odor, require immediate intervention: remove the affected soil, sterilize the pot, and treat with a fungicide. Remember, the Ariocarpus’s resilience is matched only by its subtlety—small changes can have big impacts. Stay attuned to its needs, and you’ll navigate these challenges with grace.
The Long Game: Fostering a Relationship with Your Ariocarpus
Repotting is more than a task; it’s the beginning of a relationship. Ariocarpus plants grow slowly, their progress measured in years rather than months, but their quiet presence is a reward in itself. As you tend to your plant, observe its quirks—the way it tilts toward the light, the delicate flowers that emerge like stars in the desert night. Each repotting session becomes a ritual, a moment to reflect on the plant’s journey and your own growth as a gardener. These plants teach patience, resilience, and the beauty of thriving in adversity. By repotting with care, you’re not just giving your Ariocarpus a new home—you’re becoming part of its story.
FAQ
When is the best time to repot Ariocarpus?
The ideal time for repotting is during their dormant phase, typically in late winter or early spring.
What type of soil is best for Ariocarpus?
Ariocarpus thrives in a gritty, well-draining mix that consists of 50% inorganic material and 50% organic components.
How should I care for my Ariocarpus after repotting?
Wait 5–7 days before watering and keep the plant in bright, indirect light to help it recover.

Leave a Reply