

Short Answer
There’s something almost mythic about a towering Carnegiea cactus—its ribbed columns stretching toward the sky, a sentinel of the desert’s quiet resilience. But when that botanical titan outgrows its pot, repotting isn’t just a chore; it’s a rite of passage. A misstep could leave you nursing thorns in your pride (and possibly your hands). Yet, done right, this act of horticultural bravery transforms a prickly giant into a thriving centerpiece, its roots finally free to stretch and claim their domain. Whether you’re wrangling a 10-foot saguaro or a smaller but still formidable Carnegiea, this guide will arm you with the know-how to repot large cacti without turning your living room into a battlefield of spines and soil.
The Psychology of Repotting: Why Your Cactus Might Be Holding a Grudge
Cacti aren’t just plants; they’re stoic survivors with a memory for discomfort. A sudden move—especially one that involves being yanked from a familiar pot—can feel like an existential crisis to your spiky charge. Before you even touch the soil, recognize that your cactus might be bracing for impact. The key? Approach the task with the patience of a desert tortoise and the precision of a surgeon. Rushing this process is how you end up with a toppled giant and a bruised ego. Take a moment to mentally prepare your plant. Talk to it. Explain that this is for its own good. (Yes, really. Cacti respond to intention, even if they don’t answer back.)
Gearing Up: Tools That Could Save Your Fingers (and Your Sanity)
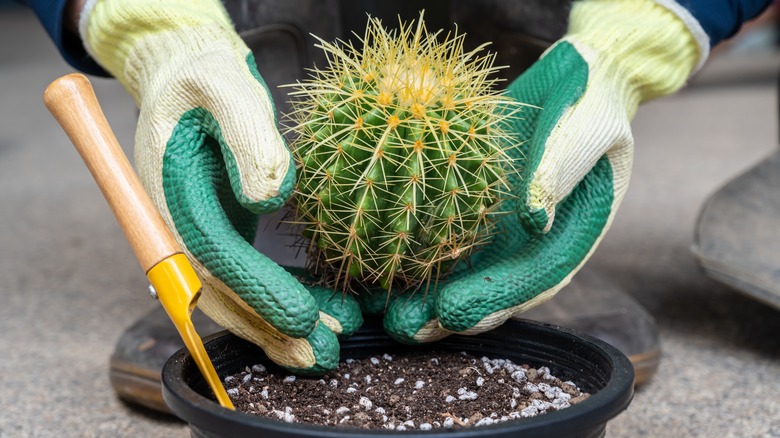
Repotting a large cactus isn’t a job for bare hands and wishful thinking. You’ll need an arsenal of tools designed to keep both you and your plant unscathed. Start with heavy-duty gloves—thick leather or specialized cactus gloves that shield your skin from the most determined spines. A pair of tongs or long-handled tweezers can be a godsend when retrieving stray spines from your grip. For the soil excavation, a serrated knife or a hori-hori knife works wonders for slicing through stubborn roots. Don’t forget a wide, shallow tray or a drop cloth to catch the inevitable cascade of soil and spines. And if your cactus is particularly massive, a sturdy wheelbarrow or a second set of hands might be non-negotiable. This isn’t just gardening; it’s tactical desert warfare.
Timing Is Everything: When to Repot Your Cactus Giant
The best time to repot a large cactus isn’t dictated by your calendar—it’s dictated by the plant’s rhythm. Spring and early summer are ideal, as the cactus is entering its active growth phase and can better handle the stress of transplantation. Avoid repotting during dormancy (late fall and winter), when your cactus is essentially hibernating and far less forgiving of disruption. Watch for subtle cues: roots peeking out of drainage holes, soil that dries out faster than a mirage in July, or a cactus that’s leaning precariously in its pot like a drunkard at last call. These are your plant’s way of saying, “I need more room, and I need it now.”
The Great Escape: Removing Your Cactus from Its Pot Without Bloodshed
Here’s where things get dicey. The moment of truth arrives when you must coax your cactus out of its pot without triggering a spiny ambush. Start by watering the plant lightly a day or two before repotting—this softens the soil and makes extraction easier. Wrap the cactus in several layers of newspaper or bubble wrap, leaving only the top exposed. This creates a barrier between your hands and the spines while still allowing you to grip the plant securely. If the pot is plastic, squeeze the sides to loosen the soil. For terracotta pots, a gentle tap on the rim with a rubber mallet can work wonders. Once the cactus is free, inspect the roots for signs of rot or pests. Healthy roots should be firm and white or tan; anything mushy or black is a red flag that demands immediate attention.
Rootbound Reality: Decoding the Underground Labyrinth
A cactus’s root system is a marvel of desert engineering—compact, efficient, and often surprisingly extensive. When repotting, you’ll likely encounter a dense mat of roots circling the soil like a tangled web. This isn’t just a sign of a healthy plant; it’s a warning that your cactus has been patiently plotting its escape for months. Gently tease apart the roots with your fingers or a chopstick, separating any that are circling tightly. If you encounter black, mushy roots, trim them away with sterilized scissors. This is the plant’s equivalent of cutting off a gangrenous limb—necessary for survival. Be ruthless but gentle; every root you save is a lifeline to your cactus’s future.
Choosing a New Home: Pot Selection for the Cactus Titan
The pot you choose is more than a container; it’s a throne for your botanical monarch. For large cacti, terracotta is the gold standard—its porous nature allows moisture to evaporate, reducing the risk of root rot. Ensure the pot is at least 2 inches larger in diameter than the current one, but avoid going overboard. A pot that’s too large can trap excess moisture, drowning your cactus in its own good intentions. Depth matters too; while cacti don’t require deep pots, a slightly taller vessel can accommodate a longer root system without toppling your plant like a felled saguaro. And don’t forget drainage holes—non-negotiable for any self-respecting cactus pot. If you’re set on a decorative cache pot without holes, use it as a liner and place the terracotta pot inside, removing it for watering.
The Art of the Soil: Crafting the Perfect Desert Bed
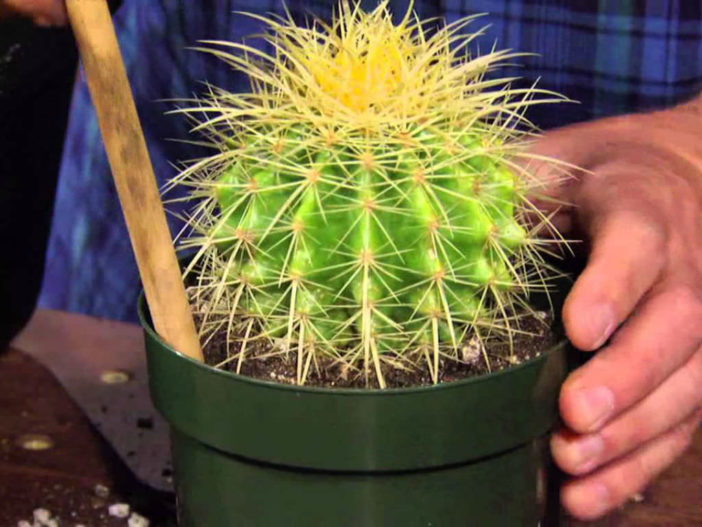
Cacti aren’t divas, but they do demand a specific soil cocktail to thrive. Standard potting mix is a death sentence for these desert dwellers—it retains too much moisture and suffocates roots. Instead, create a well-draining blend using equal parts of cactus or succulent soil, coarse sand, and perlite or pumice. For an extra boost of aeration, add a handful of crushed granite or fine gravel. The goal is a mix that mimics the cactus’s natural habitat: gritty, fast-draining, and devoid of the organic matter that would turn your pot into a swamp. Before adding the soil, place a layer of gravel or broken pottery pieces at the bottom of the pot to enhance drainage. Then, fill the pot about halfway before positioning your cactus. This prevents the plant from sinking too deep and ensures the roots have room to spread.
Planting with Precision: The Delicate Dance of Positioning
Now comes the moment of truth: placing your cactus into its new home. For tall varieties like Carnegiea, position the plant so that the base sits just above the soil line—this prevents rot and gives the roots space to anchor. Use a chopstick or skewer to help guide the roots into place, ensuring they’re spread out evenly. Avoid burying the cactus too deeply; the top of the root ball should sit about an inch below the rim of the pot. Once positioned, fill in the gaps with your soil mix, gently pressing it down to eliminate air pockets. Leave a small gap at the top to allow water to penetrate without spilling over the sides. And here’s a pro tip: if your cactus is top-heavy, place a layer of small rocks around the base for added stability. No one wants a 6-foot-tall cactus taking a nosedive onto the coffee table.
The Waiting Game: Post-Repotting Care for a Happy Cactus
The first week after repotting is critical. Your cactus is vulnerable, its roots adjusting to their new digs and its pride still smarting from the ordeal. Resist the urge to water immediately—give the roots 5 to 7 days to settle and any minor damage to callous over. After that, water sparingly, allowing the soil to dry out completely between waterings. Place your cactus in bright, indirect light to avoid sunburn, which can be as devastating to a cactus as a sandstorm. For the first month, hold off on fertilizing; your plant needs time to recover, not a nutrient overload. Monitor for signs of stress—yellowing, wilting, or a sudden exodus of spines (yes, cacti can shed spines when unhappy). If all goes well, your cactus will reward your efforts with new growth, a sure sign it’s settled into its new home.
Troubleshooting the Thorny Path: Common Repotting Pitfalls
Even with the best intentions, repotting can go awry. If your cactus starts to lean like the Tower of Pisa, it’s a sign the soil wasn’t compacted enough or the pot is too top-heavy. Stabilize it with a stake or a ring of rocks until it rights itself. Spine loss is another common issue—don’t panic if your cactus sheds a few; it’s a stress response, not a death sentence. Rot is the silent killer, often lurking beneath the soil’s surface. If you notice a foul odor or mushy stems, act fast: remove the plant, trim the rotten roots, and repot it into fresh, dry soil. And if your cactus flat-out refuses to cooperate? Sometimes, the best course of action is to give it a few days to calm down before trying again. Patience, grasshopper.
The Reward: A Thriving Cactus Titan in Your Home
When all is said and done, repotting a large cactus is less about conquering a plant and more about forging a partnership with it. The process is equal parts science and art, requiring equal measures of preparation and intuition. But the payoff? A cactus that grows taller, wider, and more majestic with each passing year—a living sculpture that connects you to the raw, unyielding beauty of the desert. So the next time your Carnegiea outgrows its pot, don’t dread the task. Embrace it. Roll up your sleeves, arm yourself with the right tools, and prepare to give your spiky giant the home it deserves. After all, every great cactus was once a repotted dream.
FAQ
What should I do before repotting my cactus?
Water the cactus lightly a day or two before repotting to soften the soil and make extraction easier.
What type of pot is best for large cacti?
Terracotta pots are ideal as they allow moisture to evaporate, reducing the risk of root rot.

Leave a Reply