
Short Answer
Repotting an Opuntia cactus isn’t just a gardening chore—it’s a delicate dance of patience, precision, and respect for one of nature’s most resilient yet prickly wonders. These sunburst-shaped sentinels of the desert, with their flat, paddle-like pads and deceptively delicate spines, demand more than just a sturdy grip and a steady hand. They require an understanding of their anatomy, their needs, and the subtle art of handling their defenses without succumbing to their formidable armor. Whether you’re a seasoned green thumb or a novice eager to cultivate your first Opuntia, this guide will walk you through the process with the care and attention these spiny marvels deserve.
The Anatomy of an Opuntia: Understanding Your Spiny Companion
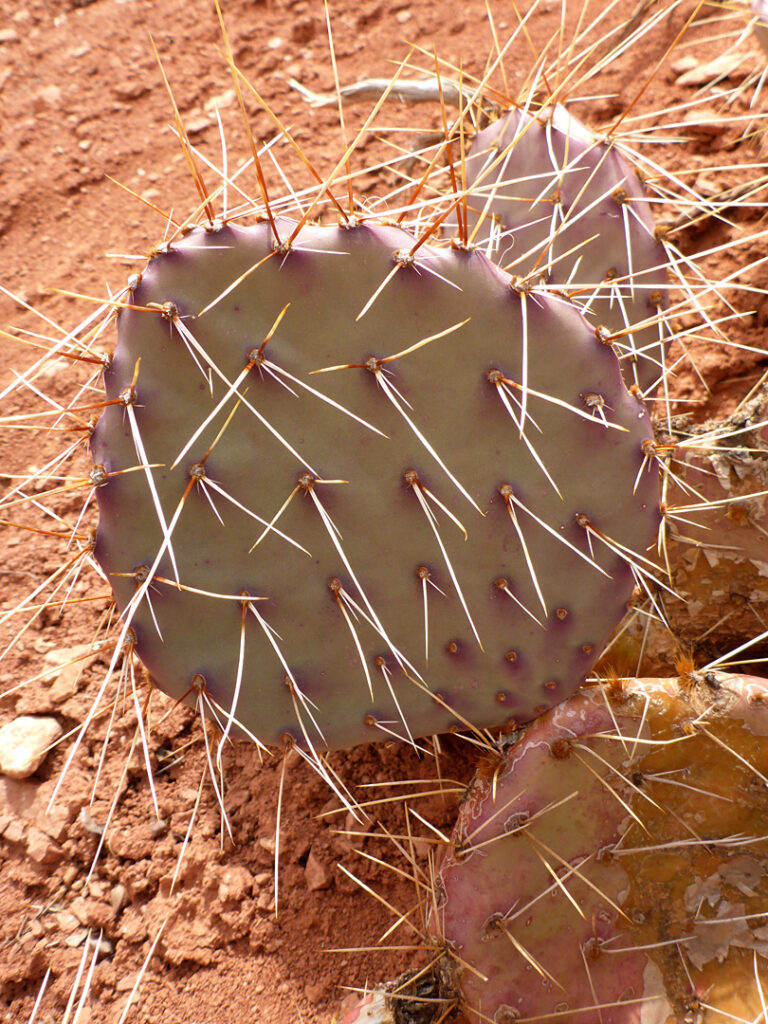
Before you even think about repotting, it’s essential to acquaint yourself with the Opuntia’s unique structure. These cacti are not just a collection of spines and pads—they’re a symphony of adaptations honed by millennia of desert survival. The flat, oval pads, known as cladodes, are actually modified stems, storing water and performing photosynthesis. The spines, often mistaken for mere adornments, are in fact highly specialized leaves that minimize water loss while deterring herbivores. Some Opuntia species even boast glochids—tiny, barbed spines that detach at the slightest touch, embedding themselves in skin or fabric with tenacious persistence. Recognizing these features isn’t just academic; it’s the first step in handling your cactus with the reverence it commands.
Choosing the Right Tools: Equipping Yourself for the Task
Repotting an Opuntia is less about brute force and more about the right tools. A pair of thick, puncture-resistant gloves is non-negotiable—leather or specialized cactus-handling gloves will shield your hands from both the spines and the glochids. Long-handled tongs or tweezers can be a game-changer, allowing you to manipulate the pads without direct contact. A sturdy, shallow pot with ample drainage holes is crucial; Opuntias despise soggy roots and will rot if confined to a waterlogged environment. Don’t overlook the soil—opt for a fast-draining mix, ideally a blend of cactus soil, perlite, and coarse sand, to mimic the arid conditions of their native habitats. And if you’re dealing with particularly large or heavy pads, a towel or piece of cardboard can serve as a makeshift shield, protecting both you and the plant during the transfer.
Timing Is Everything: When to Repot Your Opuntia
Timing isn’t just a suggestion—it’s a critical factor in the success of your repotting endeavor. The ideal window is during the cactus’s active growing season, typically spring or early summer, when the plant is primed for recovery and root regeneration. Avoid repotting in the dormant months, as the stress could stunt growth or even prove fatal. Another telltale sign it’s time for a new home is when roots begin to protrude from the drainage holes or when the plant becomes top-heavy, teetering precariously in its current pot. If you notice the soil drying out faster than usual or the pads taking on a shriveled appearance, these are also red flags that your Opuntia is begging for more space. Patience here is a virtue; rushing the process could lead to unnecessary damage.
The Delicate Extraction: Removing Your Opuntia from Its Pot
This is where the real challenge begins. Start by gently loosening the soil around the edges of the pot with a trowel or your gloved fingers, working in a circular motion to avoid damaging the roots. If the plant is stubbornly lodged, tap the sides of the pot or run a knife along the inner rim to break the vacuum seal. Once freed, cradle the base of the plant with your gloved hands or tongs, supporting the weight of the pads to prevent snapping. If the roots are densely packed, you may need to massage them gently to loosen their grip on the soil. Be prepared for a few spines to find their way into your gloves—it’s an occupational hazard, but one that underscores the importance of protective gear.
Inspecting and Pruning: Nurturing Health and Vitality
With your Opuntia safely extracted, take a moment to assess its health. Trim any blackened or mushy roots with sterilized pruning shears, as these are signs of rot that could spread if left unchecked. Healthy roots should be firm and white or light tan. If you encounter any damaged pads, use the same sterilized shears to remove them, cutting at a slight angle to prevent water pooling on the wound. This is also an opportunity to propagate—those severed pads can often be left to callus over for a few days before being replanted in fresh soil, where they’ll eventually take root and grow into new plants. It’s a cycle of life, a testament to the Opuntia’s tenacity and regenerative power.
The Art of Repotting: Creating a New Sanctuary
Select a pot that’s only slightly larger than the root ball—Opuntias thrive when slightly root-bound, as excessive space can lead to soil moisture retention and root rot. Place a layer of fresh, dry soil at the bottom of the pot, then position your cactus so that the base sits just above the rim. This prevents soil from spilling over when you water. Fill in the gaps with your cactus soil mix, pressing lightly to secure the plant. Avoid compacting the soil too tightly; Opuntias prefer a loose, airy environment that mimics their natural habitat. If your Opuntia is top-heavy, consider adding a layer of small pebbles or decorative stones to the soil surface for added stability and aesthetic appeal.
Post-Repotting Care: Nurturing Recovery and Growth
The work isn’t over once the repotting is complete. For the first week, keep your Opuntia in a shaded, dry spot to allow any minor wounds to heal and to reduce the risk of infection. Resist the urge to water immediately—Opuntias are drought-tolerant by nature, and excess moisture can spell disaster. After a week, introduce water sparingly, ensuring the soil is completely dry between waterings. Over the next few weeks, gradually reintroduce your cactus to sunlight, starting with indirect light and slowly increasing exposure to prevent sunburn. Watch for signs of stress, such as yellowing pads or a drooping appearance, and adjust care accordingly. With patience and attentiveness, your Opuntia will soon flourish in its new home, a testament to your care and its inherent resilience.
Troubleshooting Common Issues: When Things Go Awry
Even with the best intentions, repotting can sometimes go sideways. If you notice the pads beginning to wrinkle or soften, it’s a sign of underwatering—adjust your watering schedule accordingly. Conversely, if the soil remains damp for days on end, you may be overwatering, a condition that can lead to root rot. Spines that appear discolored or mushy could indicate a fungal infection, which may require treatment with a fungicide. And if glochids have embedded themselves in your skin, resist the urge to rub—use tweezers or a piece of tape to gently lift them out. Remember, every challenge is an opportunity to learn, and every Opuntia is a teacher in disguise.
Embracing the Journey: A Relationship with Your Opuntia
Repotting an Opuntia is more than a task—it’s a ritual, a quiet exchange between you and a plant that has evolved to thrive in the harshest of conditions. It’s a reminder that even the most formidable defenses can be navigated with the right knowledge and tools. As your Opuntia settles into its new home, take a moment to appreciate the intricate dance of spines and pads, the quiet resilience of a species that has endured for millennia. With each repotting, you’re not just moving soil and roots; you’re fostering a relationship, one that will reward you with growth, beauty, and perhaps even a few unexpected blooms. So embrace the process, handle your spiny companion with care, and watch as it flourishes under your watchful eye.
FAQ
When is the best time to repot Opuntia?
The best time to repot Opuntia is during its active growing season in spring or early summer.
What tools do I need to repot Opuntia?
You will need puncture-resistant gloves, long-handled tongs, a sturdy pot, and a fast-draining soil mix.
Leave a Reply