
Short Answer
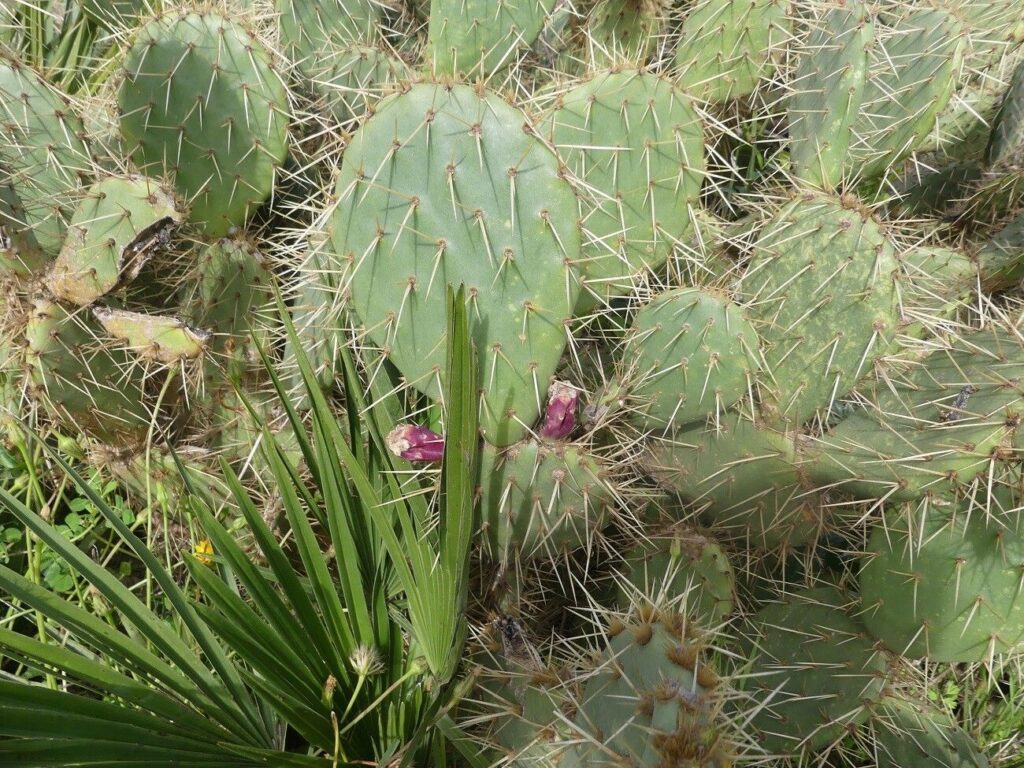
Imagine a plant so resilient, so fiercely independent, that it thrives on neglect, laughs in the face of drought, and multiplies with effortless grace. This is the world of Opuntia, the prickly pear cactus, a botanical marvel that doesn’t just survive—it propagates, it flourishes, it takes over. If you’ve ever marveled at a desert landscape dotted with these flat, paddle-shaped pads, you’ve witnessed the quiet revolution of a plant that refuses to be contained. Now, what if you could bring that same audacious spirit into your own home? What if you could grow your own Opuntia from a single pad, watching it transform from a humble cutting into a sprawling, sun-drenched colony? The power is in your hands—and all it takes is a little know-how, a dash of patience, and an unshakable belief in the magic of growth.
The Opuntia Phenomenon: Why These Cacti Are Nature’s Rebels
Opuntia isn’t just another houseplant; it’s a botanical anarchist. Native to the Americas, these cacti have carved out niches in some of the harshest environments on Earth, from the sunbaked plains of the Southwest to the high-altitude Andes. Their secret? A genius for adaptation. The flat, fleshy pads aren’t just for show—they’re water-storage units, thick and succulent, designed to hoard moisture like a miser in a drought. And those spines? Far from mere ornamentation, they’re a defense mechanism, a silent warning to would-be grazers: Touch me, and you’ll regret it. But here’s the kicker: these spines aren’t just for protection. They’re also the key to propagation. A single pad, detached with care, can root itself into a new plant, defying the odds and rewriting the rules of survival. It’s a lesson in resilience, a masterclass in turning adversity into advantage. And the best part? You can replicate it.
Choosing Your Champion: Selecting the Perfect Pad for Propagation
Not all Opuntia pads are created equal. To set yourself up for success, you’ll need to be discerning. Look for pads that are plump, firm, and vibrant—avoid any that are wrinkled, soft, or discolored, as these are signs of dehydration or disease. The ideal candidate will be a healthy, mature pad, at least a few inches long, with no signs of rot or pest damage. Size matters, but so does age. Younger pads, while eager to root, may lack the stored energy needed to sustain themselves through the propagation process. Older pads, on the other hand, are packed with the resources to thrive. Think of it as selecting a champion for a marathon: you want someone with stamina, not just enthusiasm. And don’t forget to inspect the base of the pad, where it meets the stem. This is the epicenter of root potential, the birthplace of new life. A clean, unblemished cut here is your first step toward success.
The Art of Detachment: How to Harvest a Pad Without Harming the Mother Plant
Here’s where things get delicate. Removing a pad from the mother plant is a surgical procedure, one that requires precision, patience, and a steady hand. Never yank or twist—this is a recipe for disaster. Instead, use a clean, sharp knife or pruning shears to make a clean cut at the joint where the pad meets the stem. Angle the cut slightly to prevent water from pooling on the wound, which could lead to rot. If the pad is particularly stubborn, you can gently wiggle it back and forth until it releases, but avoid using force. The goal is to leave the mother plant unscathed, so she can continue her own propagation journey while you embark on yours. Once detached, set the pad aside in a dry, shaded spot for a few days. This isn’t just idle waiting—it’s a critical step called callusing, where the cut end forms a protective layer of dried tissue. Think of it as the plant’s way of bandaging its own wounds. Skip this step, and you risk inviting rot, mold, or worse. Patience here is your greatest ally.
The Waiting Game: Understanding the Rhythms of Root Development
Now comes the hardest part: waiting. Root development in Opuntia isn’t an overnight affair. Depending on the species, environmental conditions, and a dash of luck, it can take anywhere from a few weeks to a couple of months for roots to emerge. During this time, your pad will sit, seemingly inert, while beneath the surface, a quiet revolution unfolds. Resist the urge to prod or poke at it. These early stages are delicate, and disturbance can disrupt the process. Instead, place the callused pad in a warm, bright location—think a sunny windowsill or a greenhouse—but out of direct, scorching sunlight. A light layer of coarse sand or perlite can help wick away excess moisture, preventing rot while allowing the pad to breathe. And here’s a pro tip: mist the pad lightly every few days, just enough to keep it hydrated without drowning it. It’s a balancing act, one that rewards patience with the promise of new life.
From Pad to Plant: Transplanting Your Opuntia with Confidence
When roots finally appear—thin, wiry, and tentative at first—it’s time to celebrate. But don’t rush the process. Wait until the roots are at least an inch long before attempting to transplant. Choose a pot that’s just large enough to accommodate the new growth, with ample drainage holes to prevent waterlogging. A mix of cactus soil and perlite or pumice will give your Opuntia the gritty, well-draining environment it craves. Gently nestle the rooted pad into the soil, ensuring the base is snug but not buried too deeply. Water lightly at first, then hold off until the soil is completely dry. Overwatering is the fastest way to kill a fledgling Opuntia, so err on the side of caution. Place your new plant in a spot where it can bask in bright, indirect light, and watch as it stretches its pads toward the sun. This is where the magic truly begins: a single pad, once a humble cutting, now a thriving, self-sustaining organism.
Troubleshooting the Unexpected: When Propagation Doesn’t Go According to Plan
Of course, not every propagation attempt will be a success. Sometimes, pads rot. Sometimes, they shrivel. Sometimes, they just… sit there, stubbornly refusing to root. Don’t despair. Even the most seasoned gardeners face setbacks, and each failure is a lesson in disguise. If your pad is rotting, it’s likely too damp—reduce watering and improve airflow. If it’s wrinkled or soft, it’s dehydrated—give it a light mist and more shade. And if it’s just not cooperating? Try again. Propagation is as much an art as it is a science, and like any art, it demands experimentation. Keep records of what works and what doesn’t. Adjust your approach. Trust your instincts. And remember: every Opuntia that fails to root is a stepping stone to the one that will.
The Ripple Effect: How Your Opuntia Can Transform Your Space—and Your Mindset
Once your Opuntia takes root, something extraordinary happens. It doesn’t just grow—it multiplies. A single propagated pad can become a colony, a living sculpture of resilience and beauty. Place it in a sunny corner, and it will transform the space, infusing it with a sense of wild, untamed energy. It’s more than a plant; it’s a statement. A reminder that growth isn’t always linear. That setbacks are temporary. That even the most prickly exteriors can give rise to something tender and enduring. And as you watch your Opuntia thrive, you’ll begin to see parallels in your own life. The way it bounces back from neglect. The way it adapts to its environment. The way it refuses to be confined. It’s a lesson in tenacity, a testament to the power of starting small. So go ahead. Propagate that pad. Watch it defy the odds. And let it remind you that sometimes, the most revolutionary acts are the ones that begin with a single, brave step.
FAQ
What is Opuntia?
Opuntia, commonly known as prickly pear cactus, is a genus of cacti known for its paddle-shaped pads and ability to thrive in arid conditions.
How long does it take for Opuntia pads to root?
It can take anywhere from a few weeks to a couple of months for roots to develop, depending on various environmental conditions.
FAQ
What is the best time to propagate Opuntia?
The best time to propagate Opuntia is during the warmer months, typically in spring or early summer when the plant is actively growing.
How long does it take for Opuntia pads to root?
Root development for Opuntia pads can take anywhere from a few weeks to a couple of months, depending on environmental conditions.
FAQ
What is the best time to propagate Opuntia?
The best time to propagate Opuntia is during the growing season, typically in spring or early summer, when the plant is actively growing.
How long does it take for Opuntia pads to root?
It can take anywhere from a few weeks to a couple of months for Opuntia pads to develop roots, depending on environmental conditions.
What should I do if my Opuntia pad is rotting?
If your Opuntia pad is rotting, reduce watering and improve airflow around the plant to prevent further decay.
FAQ
What is Opuntia?
Opuntia, commonly known as prickly pear cactus, is a genus of cacti native to the Americas, known for its flat, paddle-shaped pads.
How long does it take for Opuntia pads to root?
Root development can take anywhere from a few weeks to a couple of months, depending on various factors.
What is the best way to care for newly propagated Opuntia?
Ensure the plant has good drainage and place it in bright, indirect light; avoid overwatering.
FAQ
How long does it take for Opuntia pads to root?
Root development can take anywhere from a few weeks to a couple of months depending on species and conditions.
What should I do if my Opuntia pad is rotting?
If your pad is rotting, reduce watering and improve airflow to prevent further damage.
FAQ
What is the best way to propagate Opuntia?
The best way to propagate Opuntia is to select a healthy, mature pad, remove it carefully from the mother plant, allow it to callus for a few days, and then plant it in well-draining soil.
How long does it take for Opuntia pads to root?
Root development in Opuntia can take anywhere from a few weeks to a couple of months, depending on environmental conditions.
What should I do if my Opuntia pad is rotting?
If your Opuntia pad is rotting, it is likely too damp. Reduce watering and improve airflow around the plant.


Leave a Reply